appnext

Jumat, 23 Mei 2014

News from the garage

My apologies for the small break in blog posts lately, I have been doing many little odd jobs in the garage and thought it would be most efficient to deliver a round-up post when I had enough news. So, here is a brief overview of the past month of activity....

My glamorous assistant has been dropping by occasionally to continue stripping the shell. Starting to make some real headway at the front end now:


Meanwhile I set about cutting out chunks of rusty bad metal from old repairs that I could no longer stand the sight of:


However, it has recently come to my attention that the front of the car has had a shunt in the past, as there is some buckling and creases along front quarter panels that were not part of the original factory pressings (hard to see from this photo, but it is quite blatant in real life):


I have a feeling that I will end up replacing the front quarter panels entirely, but as my experience and confidence in making these judgement calls is still lacking I shall make this decision at a later date. Even so, I decided to press on and began stripping the passengers side:


As the eagle-eyed of you may gather from the semi-outdoors shots of the shell above, I finally got the rear of the car up on casters! Again, I significantly shortened the width of it to maximise the overall space in the garage:


This one turned out to be more unstable than the front one with a quite a bit of lateral play, so I added some additional support for peace of mind. The shell can now be maneuvered in the garage by one person, however taking in it onto the often muddy terrain outside still requires the assistance of an extra willing person. I am happy though because, with the summer months approaching, I can simply roll the shell outside whenever I need to liberate a bit of workshop space! 


Oh, something I forgot to mention in my previous post; when I was inspecting the state of spare wheel well area I found evidence of an improvised repair using fibre-glass that I was able to pick off in small pieces using my fingers! I am now starting to desensitise to the all the lurking horrors and have accepted that it is all part of the fun of restoring an old car:

Senin, 21 April 2014

The pros and cons of my blasting rig


After a lot of research I decided to go for Aluminium Oxide (60 � 80 grit) as my blasting media. I was able to pick up a 20kg tub locally and added the whole lot to the hopper. I blasted these small inspection hatch pieces to get a feel for it:


I was delighted with the results as the surfaces are amazingly clean and it seems to be gentle to the healthy metal under the rust. Plus, the embossed factory numbers are preserved in amazing condition, something that a wire wheel would have no doubt damaged or partially erased. For a before/after comparison, here is a vent cover from one the heater channels with a thick layer of paint and crud all over it:


After a quick sandblast:


And finally everything gets the usual lick of primer:


However, not all is as good as it seems. There are a couple of annoying problems with my current set-up. Firstly, my little 2.5Hp compressor cannot keep up with the air demands of shot blasting. It has a tiny 24L tank and it is just not enough to hold a sufficient volume of air. In fact, I can only blast for about 8 seconds then I have to wait for it to re-pressurise and this recovery time gets frustrating after a while. Having looked into my options I have identified 3 possible solutions:


1. A more powerful compressor � this would be ideal however for a hobbyist like me this does not make good economic sense because a big compressor that has the spec required is a LOT of cash!


2. Add an expansion tank � I could link a receiver tank to the compressor to increase the overall volume of compressed air at my disposal. This would allow me to a much longer blasting time, but on the flipside the recovery time would be equally longer.


3. Link two compressors in together in tandem � this I feel is the ideal solution. Basically I need to get another little cheap compressor and join it together with my current one with a �y� connector. This would increase the overall tank size and recovery time. Best of all I could set the compressors to kick in at slightly different times (e.g: one starts when the pressure hits 90psi and the other when the pressure dips to 80psi).  


The second issue that I was encountering was the amount of dust being generated which obscured vision a lot quicker than I had anticipated. I think I will rig up a vacuum extraction system at the time I add a 2nd compressor. In fact, I have an old vacuum cleaner that would be ideal for the task! Stayed tuned...

Senin, 31 Maret 2014

New toy!

Manged to bag myself this eBay bargain shot blast cabinet over the weekend:


Unfortunately it didn't come with the mesh screen (floor section) and the perspex window was all frosted up, but I thought a quick trip to my local DIY store would cure those minor problems. Unfortunately the shop didn't stock perspex or meshing! However, on the way back to the garage I came across some metal mesh dumped in a bush next to a bus stop - literally the perfect width as well! So, after a quick trim with the angle grinder and the persuation of a hammer to flatten it out, I had it sitting inside the cabinet perfectly snug! 


Now I have just got to get some blast media and it will be good to go (albeit with a slightly frosty viewing window)!  

EDIT (23/05/14): I now have some new Perspex (clear acylic/plexiglass) windows for the shot blast cabinet. I found that it was cheaper to order this stuff as a made to measure item online than it was to purchase a big sheet at a diy store, which would still need cutting down to size! The only real sting was the cost of postage � but I offset this cost by ordering 10 units at once, so this batch should last me some time!

Kamis, 27 Maret 2014

Introducing...

My glamorous garage assistant:


So, I was delighted to got some much needed assistance last weekend in the form of my girlfriend, who turned out to be an absolute demon with the angle grinder and drill-mounted wire brush. Whoooop! Plus, she later confessed that she enjoyed working on the car � so I have a feeling that she is likely to become a regular fixture in this ongoing resto story...

Started with the inside of the rear quarter panels and got them primed up:


Then we began stripping the driver�s side front quarter:


A close-up of a couple of really crusty areas that made me shiver:


As usual there was a lot of filler slapped all over the place and a lot of tatty old repair patches slowly emerged from beneath the underseal:


Whilst my girlfriend battled on with the dirty work I decided to upgrade my front saw horse. Basically narrowed it to about a third of the original width and added some heavy duty braked casters to the bottom:


I actually ended up removing the top angled cross-brace sections as it was preventing the car from sitting back down on it correctly (forgot to factor-in the obvious!). Even without these sections it felt suitably sturdy and as the shell is now almost completely stripped of components I was not too concerned about the weight issue compromising the integrity of the structure.


It feels great to have a bit more working space around the front of the car now. I will get the rear saw horse sorted out next and then the shell should be fully maneuverable at last!

Rabu, 26 Februari 2014

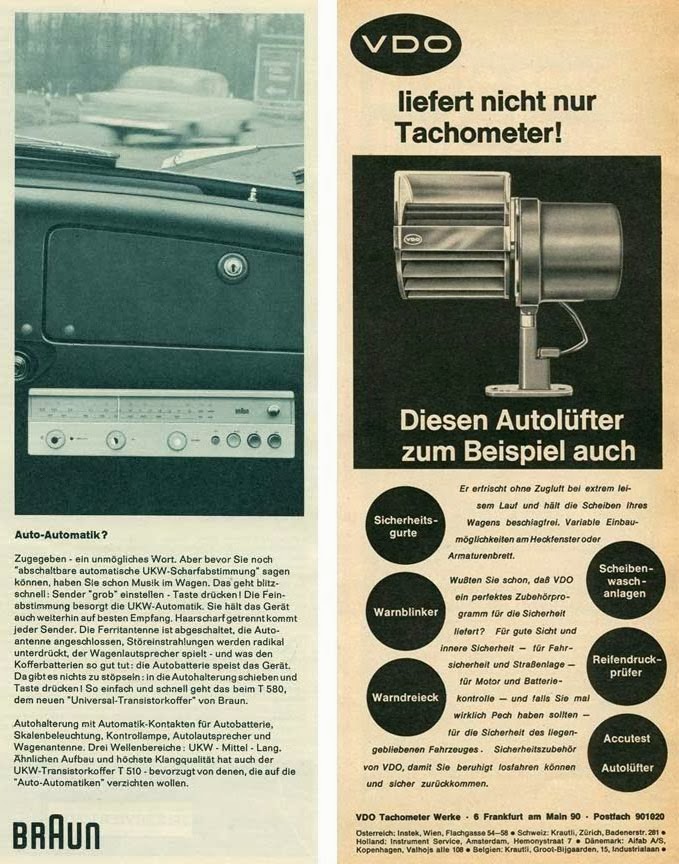
Die Autol�fter


Came across this little rarity recently whilst sifting through my box of miscellaneous vw parts:


It is a VDO/Braun �Autol�fter� dash mountable fan and it was given to me 10 years ago by an old neighbor. I remember being out in the street one afternoon having just moved to Bristol and was tinkering away on the bug when a delightful chap came over and starting chatting to me about the old vw's that he had owned over the years. He suddenly recalled that he probably had a few old accessories kicking around in his attic and hurried off into a house a couple of doors down from where I used to live. He came back maybe 15-20 mins later with this lovely item that he wanted me to have and did not want anything for it in exchange. I never saw him again after that day and I have long since moved, but I still think about what a generous stranger he was! It is going to look great once it is all cleaned up and mounted in the center of the dash when this resto is eventually complete.


After some searching of the interweb I came across some images from the instruction manual. This great illustration shoes how and where the fan mounts on a Beetle dash:

Kamis, 20 Februari 2014

The Reddening!

Pushed on with cleaning the inside of the shell this week. Finished stripping the crud off of all the fiddly areas in and around the boot section and gave it all the usual lick of primer:


Then moved onto the rear quarters. Made quite a mess when the grinder/wirebrush combo came into contact with the insulation material that was attached to the inner side of the outer skin:


The mashed-up residue got everywhere and because it is sticky by its own nature it had a habit of bonding itself to everything it landed on - including my head! Was quite a satisfying task though in a strange way. Once again, all the bare-metaled areas received a liberal coat of primer: 


Having grown sick of the sight of the awful patched-up area on the drivers side rear crossmember, I decided to action.... of the angle grinder kind:


I know it doesn't look like much of an improvement, but at least I have revealed what is left of the original metal and most significantly I have some good reference points to work off when I come to fabricating new patches. So, here's how things are currently looking in the back:

Selasa, 11 Februari 2014

Still procrastinating on the shell

Finished cleaning up the rear valance and removed the remains of the tatty old seal lip: 


As always I gave the area a lick of primer:


Then I turned my attention and arsenal of wire brushes to the rear interior area. I did not know what I was going to find under all the rust, horsehair, glue residue and seal sealer:


There are the typical areas that will need patching such as the outer corners that curve around the wheel arches: 


And just below the rear window the was some corrosion that will need rectifying - I always remember the window seal being cracked, brittle and generally past its prime. I just wish that I would have had the sense to replace it before the bloody spongy moss started growing on top of it!


...but in all I was relatively relieved to discover that the whole boot section was in a fairly good state:


So, lots of fiddly sanding (which is still ongoing), but I am enjoying myself just plodding along on the shell. It is just a task that seems to fit my mood lately. Away from the garage I am on the lookout for a shot-blast cabinet so that I can strip some of the trickier parts (and there is far more of them than I first imagined!) - but to find anything that can contain parts of substantial bulk within the rather meager budget I have allocated is proving tough. So, I am weighing up my options and considering building one from scratch out of reclaimed wood. So, watch this space for a possible project tangent in the near future!